Thursday, 21 June 2012

How to Make Minis Using Plant Materials

Look around you when you are out for a walk or in your garden and you're bound to see natural materials that can be used for making minis. We've just had a load of firewood delivered so now I have sheets of bark and blobs of lichen to play with!
 Here are some plants that I've used to make miniatures:

  • Capsicum seeds when dried make perfect potato chips.
  • Grape pips when dried look like little pears for a fruit bowl or food sack.
  • Grape stems can be dried and when foliage is glued on can be used for trees.
  • Lichen can be separated into tiny bits and glued on roof tiles in places to make a dolls house roof look old. Or it can be left in clumps and used as bushes in a garden, especially if sprayed green.
  • Acorn caps when sandpapered smooth make nice wooden bowls.
  • Coriander seeds look like 1:12 scale nuts.
  • Walnut shells make tiny cradles. Or I have used them sliced across as wooden platters, as in the photo.
  • Strips of bark look great as the outer covering of a woodland cottage or tree stump house.
  • Thin tree branches, sliced into rounds, make stepping stones in a garden scene.
I'm sure you have more ideas for using plants as minis. Let me know!

Tuesday, 19 June 2012

A Dolls House Kit Set in 1:144 Scale

A 1:144 Scale Dolls House
I enjoyed making up this 1:144 scale dolls house kit set from NorthEastern Scale Models. Because they are laser cut, the pieces fit together very easily and precisely. 
 The house is called the Cottage Kit. I decided rather than have it as a 'dolls house for a dolls house' I would make it a stand-alone display piece. I like the shape of it and the wrap-around porch.
  I painted and wallpapered all the pieces before gluing them together. Better beforehand than trying to manoeuvre a paint brush into those tiny rooms! I also glued a scrap of lace behind each window as curtains at the same time as painting.
  The finishing touch was to landscape it. I do enjoy scattering all that fake grass around! The climbing vine twined around the porch posts is made from 3 strands of green embroidery thread pulled through tacky glue, positioned and left to dry. The flowers are dabs of red flocking placed with a toothpick on dots of glue.
  I find doing small projects like this gives great satisfaction. An hour or two and you're done. Now what's next?

Tuesday, 12 June 2012

Making Miniatures in 1:12 Scale

If you are looking for a book about making minis that has useful diagrams, scale patterns and a range of complete projects, then Making Miniatures in 1:12 Scale  by Venus and Martin Dodge could be very helpful.  It caters for miniaturists who are just beginning in the hobby as well as to the more experienced. 
  The projects provide all you need to know to make the full settings, from the container down to the smallest accessory. For example, the chapter on making a potting shed begins with constructing the shed and goes on to show how to make the little things to go inside it, such as a broom and a ladder.
  This book starts with chapters on how to make room boxes out of wood as well as general advice on what hand tools and power tools are needed.
  If you don't want to make a construction out of wood, then there are chapters on making 'shoebox rooms' out of thick cardboard.
  You can choose to make scenes as varied as a mermaid in a real goldfish bowl, a market stall, a secret garden, a farmhouse kitchen, a lady's bedroom or a fashion emporium.
  All the projects can be stand-alone settings or the ideas could be incorporated into your dolls house.
  The authors have many years experience making dolls houses and miniatures and have written other useful books on the subject.


Tuesday, 5 June 2012

How to Make Plates for Your Dolls House

Making 1:12 Scale Plates
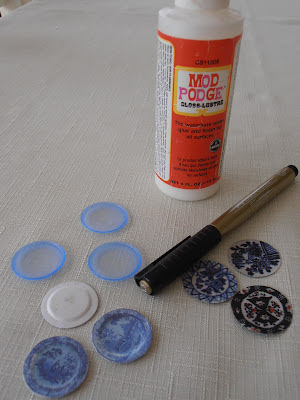
If you don't want to buy 1:12 scale china plates for your dolls house, here's an easy way of making substitutes from cardboard or plastic. In half an hour, you can make a whole stack of dinner plates.
  You will need:

  • the plastic inserts that are in the lids of soft drink bottles  or
  • a packet of already shaped cardboard plates from miniatures suppliers
  • pictures of suitably sized plates cut from magazines
  • modpodge ( a water-based sealer and glue)
  • paintbrush
  • gold pen
  • nail scissors
My photo shows both the plastic and the cardboard plates. You might choose to use one kind or the other.
  1. Brush a small amount of modpodge onto a plate.
  2. Stick a picture of a plate onto it, pressing down firmly to get out any air bubbles and wrinkles.
  3. Brush more modpodge over the picture. The modpodge goes on milky but dries clear and gives a nice shine to the surface.
  4. Let dry.
  5. Trim the edges if necessary.
  6. Go around the plate edge with the gold pen to finish it off nicely.
Get busy on these and your dolls house kitchen cupboards will be filled in no time!