Wednesday, 19 December 2012

Merry Christmas to You

A Miniature Father Christmas
Here's a tiny Santa Claus I made from a kit set one Miniatures Club Day. He's a 'shelf sitter' and very cute!
   Thank you so much for following my blog this year and for the encouraging comments and emails I've had. It has been a pleasure writing about our wonderful, creative miniatures and dolls house hobby.

  I wish you all
      
            a very Merry Christmas 

and I sincerely hope that 2013 will be a great year for you! See you in the New Year!

Thursday, 13 December 2012

How to ... Tips for Miniature Embroidery

Sue Bakker's Bargello Embroidery in Progress
Throughout her career in needlework, both 'real size' and miniature, Sue Bakker has been committed to raising the standard of embroidery. So she was happy to share with us her tips and hints for our miniature stitching.

  1. Frame up your work before you start embroidering. For smaller pieces use a hoop. A wooden frame with the canvas or cotton fixed along the edges with drawing pins is good for larger items. For silk gauze use a cardboard frame. Using a frame keeps your hands off the work so it is cleaner and it also helps to keep the material from pulling out of shape.
  2. Start the embroidery in the middle of the pattern. By beginning there and working outwards, the material will not distort as it could if you began stitching on one edge.
  3. For the design details, use half cross stitch. To save trailing threads across the back of the work between the designs, work every alternate stitch outwards, then fill in the gaps as you work back to where you began.
  4. For the backgrounds, use basketweave stitch. This fills in the spaces nicely and keeps the material lying flat. By stitching carefully, the back of your mini embroidery can be as neat as the front.
The back of Sue Bakker's embroidery is as neat as the front
      5. Before you get to the edges of a carpet, work the last row of the outside border, then fold the material over to the underside along this last row of stitching. Do overcast stitch to wrap the edge, then go back to complete the border in basketweave stitch and half cross stitch, working through both layers of the fabric. 
      6. For a fringe, use Surrey stitch as it is neat and not bulky.

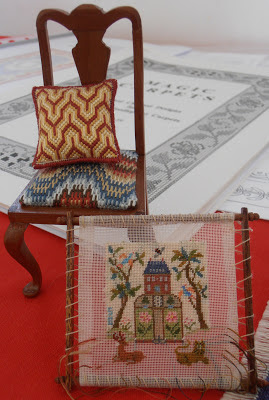
The embroidery in the frame is done on 60 count gauze!
  Many thanks to Sue for showing us these tips. We're all inspired to get stitching now!


Sunday, 9 December 2012

Sue Bakker, Miniaturist: Embroidery

Sue Bakker 
We were very fortunate at our miniatures club yesterday to have as our guest, Sue Bakker from Scotland. Sue's speciality is miniature embroidery and her work is of such a high standard that pieces are displayed in museums and galleries in the United Kingdom and United States.
  She is a member of GMNA (the Guild of Miniature Needle Arts) and a founder member of the Miniature Needlework Society International.
  Sue kindly agreed to answer my questions.
Wendy: Did you do 'full size' needlework before you started stitching in miniature?
Sue:  Yes, I did my training at the London City and Guilds specialising in creative embroidery.
W: How did you get involved with miniatures?
S:  My sister-in-law had a big dolls house and one day I offered to stitch a carpet for it. That was in the 1980s and I could find only one book, a Dover Publication, that had embroidery charts for a carpet. So I decided I would design my own pattern and since then I always have. That carpet for my sister-in-law started me doing embroidery in the dolls house 1:12 scale.
W: And how did your career in miniature embroidery grow from there?
S: I was invited to exhibit at the 1989 Kensington Dolls House Show and did so every second year until 2001. As well as carpets I had stitched I produced small items such as cushions, fire screens, and footstools for sale. I developed a range of embroidery kit sets and charts, with new patterns available for each fair. I also attended some of the dolls houses and miniature shows in the United States.


Examples of Sue Bakker's embroidery in 1:12 scale
(It was interesting to see Sue's blue and white oriental carpet (above) as that is the one I did in green for my Edwardian dolls house and another member of our club has stitched it in brown tones.)

S: As I became more well-known I began to get commissions from clients in the United Kingdom and America. I also collaborated with (miniature) furniture designers to incorporate embroidery into some of their pieces.
  For about 12 years I wrote for and designed charts for the International Dolls House News magazine.
W: Do you have a dolls house?
S:  No, but I do have a glass fronted display cabinet that I have made miniature room settings in. My favourite is the Georgian room - I love that era's embroidery and china so I have been able to display many miniature pieces in it.


Sue's favourite miniature room, as shown in the International Dolls House News magazine.
W: Many thanks, Sue, for an interesting chat, and for donating patterns to our club. 

We were all in awe of Sue's embroidery, some of it done on 60 count silk gauze (that's 60 stitches to the inch!) We were also so impressed that the back of Sue's needlework is as beautiful as the front!
In my next blog post, (How to ...Tips for Miniature Embroidery) I'll share the hints and techniques Sue gave us to improve our miniature stitching projects.


Tuesday, 4 December 2012

Miniature Christmas Village on Display

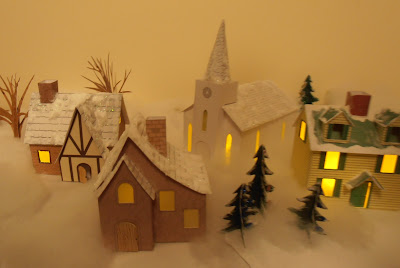
The Christmas Village made of paper
Here it is, the miniature Christmas Village that started out as a paper kit set. Today I placed some white material over a small table and set out the buildings and trees. Inside each building is a LED candle.
  Then I disembowelled a cushion! The fibrefill stuffing is the snow on the ground.
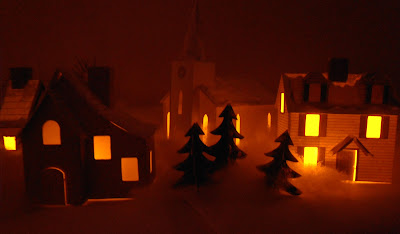
  At nightfall I turned on the candles and took these photos.


Now I'm really in a Christmassy mood!

Sunday, 2 December 2012

How to Make Snow in Miniature

Making Snow for Miniatures
You would have laughed this afternoon if you could have seen me making my miniature Christmas village look cold and wintery. It involved a lot of glue, a teaspoon, glitter and baking soda, of all things!
  Firstly I sat each mini house and the church in a plastic container. Then I dribbled glue quite thickly in the places I wanted the snow to sit on the roofs. The next step was to spoon baking soda over the gluey patches. I used several teaspoonfuls on each house so the snow looked as if it had piled up around the chimneys and along the roof edges. Because the houses were in the containers it wasn't too messy a job; the excess baking soda just fell into them. And I shook the houses just before the glue dried so the extra 'snow' dropped off too.
  The piece de resistance was squirting white sparkly glitter over the snow. I'm pretty pleased with the result.
A Snowy Miniature Scene