Showing posts with label Christmas in the Dolls House. Show all posts

Sunday, 15 December 2013

Merry Christmas to you all

Christmas Greetings from my house to yours

In my travels in Germany this year I visited a couple of Christmas (open all year round) shops and found this tiny miniature nativity scene. You'll realise just how small it is when I point out that it is housed in a walnut shell!

  Wishing you all a very happy and safe     Christmas and a year full of mini         making in 2014.

                           See you then!
                                              
                                               Wendy

Wednesday, 4 December 2013

The Christmas Box is Finished

The Christmas Break Front Box


Remember a few blog posts ago when I showed you the photo of pieces of wood, ready to be made into a 'break front' box? Well, here it is, finished at last!
  So, take off the lid....
The box lid is covered in fabric and tied with ribbon
Then let down the front and there you have it - a Christmas market stall selling Santas!

A good way to display my collection of little Santas

The side that folds down gives extra display space

Showing the layout of the box interior

A close-up view of some of the miniatures
I am pleased with the way this has turned out. I think it will have pride of place under our Christmas tree this year!

Thursday, 21 November 2013

Decorating the Christmas Box

Starting to paper the box interior
The first step in decorating the basic 'break front' box was to cover the interior with wood panel paper, specially made in 1:12 scale for dolls houses. 
  I did that at Minis Club day this month, although I seemed to do a lot more talking than gluing!
  
Adding the display boxes and counter

This week at home I made the counter to fit the width of the box & covered that in the wood paper too, and stuck in the two smaller display units.

Assembling the box lid

I had already glued the lid of the box together and painted it white, inside and out. Now I glued the wood paper inside the lid and stuck the red and white fabric to the top of the lid. It is easier to use the fabric larger than the lid and then cut it with a craft knife to size, after the glue has well and truly dried.

Adding fabric to the box exterior
  I left the fabric in one long piece so I could wrap it round the three sides of the box without having to cut pieces and match up corners. To make a neat edge at the top of the sides I folded under the fabric and carefully glued it on. I used a tacky glue suitable for material. Then I folded the bottom edges to the underside of the box so all looked trim and smooth. So far, so good.
  I'll soon be ready for the fun part - filling the 'market stall' with Santas!

Thursday, 7 November 2013

The 'Break Front Christmas Box - Preparing the Materials

Preparing to decorate the Christmas box
This week I've been gathering my supplies to make the 'break front' box I'll decorate as a Christmas market stall. I read that in Nuremberg, Germany, the famous Christmas market stalls have traditional red and white striped canopies, so I was off to the material shop to buy some fabric like that. I found in my 'stash' the wood panel paper and the cobblestone card, the strands of lycopodium to make wreaths, the two tiny Christmas trees and of course, my tin of mini Santas. Off to the shops again and I tracked down the strings of little Christmas lights that are actually scrapbooking decorations, and the Christmas stickers which have greetings in German, perfect for my theme.
  At minis club this weekend I hope to attach the side of the box that will break away, and decorate the inside with the wood paper and the outside with the red and white fabric.
  More photos and an update to come!

Wednesday, 30 October 2013

How to Make a 'Break Front' Box for Christmas

The start of the project
These bits of wood don't look very exciting, do they? Over the next few weeks I'll be transforming them into a 'break front' box with a Christmas theme. The finished box with lid will look like a wrapped Christmas present tied with ribbon. But when you lift off the lid, the front will 'break' away and fold down so you can see the scene inside. (That's the theory!)
  We started this project at Minis club this month. The pieces to make the 8 inch square boxes  had been cut out for us and we glued them together with wood glue to make the box with three sides, the arched insert and the lid. One side (the break away side) was left to be dealt with at our next meeting.
  Once the glue had dried and the joints were stable, we painted the box and lid with undercoat.
The box and lid are made, glued and painted
  I decided not to use an archway like this. I want to make my box look like a German Christmas market stall, so cut the insert piece up to make the counter and display area.
   From my 'stash' I took a piece of wallpaper that looks like wood panelling and will use that to paper the interior. I also found a couple of little boxes I covered in the wood effect paper to make display stands.

Using paper that looks like wooden boards
  My Christmas market stall will sell Santa Claus ornaments. I've been collecting them on my travels for several years so it will be great to have a place to display them.
Some of the Santa ornaments for the Christmas market stall
I'm looking forward to doing more work on the box at our next Minis club meeting. I'll keep you posted on how it's progressing.

Tuesday, 4 December 2012

Miniature Christmas Village on Display

The Christmas Village made of paper
Here it is, the miniature Christmas Village that started out as a paper kit set. Today I placed some white material over a small table and set out the buildings and trees. Inside each building is a LED candle.
  Then I disembowelled a cushion! The fibrefill stuffing is the snow on the ground.
  At nightfall I turned on the candles and took these photos.


Now I'm really in a Christmassy mood!

Saturday, 24 November 2012

More on the Christmas Village in Miniature

All Made From Paper for the Christmas Village
I've been folding paper and glueing paper this morning and these are the results - the church for my Christmas village and two types of trees. I must say that the bare branches ones were extremely fiddly to do. I lost count of the number of times they fell apart! But now, as you can see, they are standing at last.
  When I have decorated the church with the snowy stuff and glitter I'll be able to put in the vellum paper windows. I'm wondering if I used coloured highlighter pens on the vellum, would I get a stained glass effect?  There is a generous amount of that paper supplied so I think I'll give it a try. I'll let you know the results.

Tuesday, 20 November 2012

Mini House for the Christmas Village

All the house parts are pre-punched - no need for scissors!
What a dream it is putting the miniature houses together! They are made of heavy paper which is pre-punched so you just need to push the pieces out of the background paper. And the lines to fold are all pre-scored as well so you know exactly where to bend the edges to make the tabs for gluing, and where to bend the wall lines.
Assembling the house parts
Once the pieces are all folded properly you can glue them together. The glue that is supplied with the kit is VERY sticky and, in my usual battle with adhesives, I managed to get more on my fingers than on the house walls! I needed to stop every now and again and wash my hands with hot soapy water.
The house ready for decorating
Here is the house, all stuck together and ready for decorating. The instruction book suggests putting the 'glass' in the windows after you've finished using the glitter and fake snow so the panes stay clear.
  I'll make the other houses now and get out the glue, glitter and snowy stuff when they're done. Then I can make one big mess instead of several little ones!! I must remember not to breathe in when I'm squirting glitter around!

Thursday, 15 November 2012

Making a Christmas Village

A Christmas Village Kit Set
Well, I got quite a surprise when this arrived in the mail. I had ordered it from an on-line store, thinking I was getting a book with patterns and instructions for the little houses. The photo they'd put up had the bottom of the picture cut off so I didn't see the 'includes' part.
Inside the Christmas Village Kit
  What I got was this box with everything you need to build the Christmas village: the instruction book, the glue, the glitter, the heavy paper house patterns, even a ready-made Christmas tree.
An Example of a Paper House
What I really like about the kit is that the paper parts are pre-punched and scored - you don't even need scissors.
  The kit makes 3 houses, 1 church, several green Christmas trees, 2 trees with bare branches, a dog kennel, a snowman and a picket fence. And in the book are more of the patterns so you can photocopy them off if you want to make more buildings.
  It is not dolls house scale - it's more railway OO scale, I think. I'm planning to put it on my (real house) mantelpiece at Christmas.
  I'll keep you up-dated as I build it!

Thursday, 22 December 2011

Are You Dreaming of a Dolls House for Christmas?

Have you made a wish list for Christmas? Does it have 'dolls house' at the top? You have probably been dreaming about getting a new dolls house for ages. Reading miniatures books and magazines, going to dolls house shows, checking out other people's minis. In your mind, you will have built and decorated every inch inside and out. Will there be a dolls house under your Christmas tree?
   Choosing the perfect dolls house is not easy. I'm sure you will want one bigger than this tiny 1:160 scale one! But you do need to consider how much space you have in your real house to display a dolls house. Then there are the various scale measurements that determine a dolls house dimensions.
   Another thing to think about is whether you want to buy a ready built, decorated dolls house; a kitset one that you can put together and decorate; or if you will build a house completely from scratch. Will it be built of plywood, MDF or lightweight foam core?
  What style will your dream dolls house be? Tudor, Victorian, Georgian, Edwardian, Art Deco, or modern?
   Oh, it's fun, isn't it, planning your next miniature project! 
   I wish you all  a very Merry Christmas and a wonderful year of mini-making in 2012. See you next year!


Sunday, 18 December 2011

Christmas in the Dolls House: Mini Elf Decorations

Mini elves for Christmas decorations
These mini elves are cute enough to hang on your real size Christmas tree as well as decorate your dolls house. The kids can help make them as a fun holiday activity. You'll probably already have the materials in your craft stash for these 'Santa's Little Helpers'. 
You will need:
  • Small wooden bead
  • Red perle cotton or thin wool
  • Green perle cotton or thin wool
  • White felt
  • Cardboard
  • Red felt
  • PVA or UHU glue
    1.  Cut the white felt into a little triangle for the beard. Glue this to the lower part of the wooden bead that is the head.
    2. Cut a 4 cm length of the red cotton or wool and fold it in half. This will come out the top of the hat as a hanger.
    3. Cut the red felt into a cone shape and glue it on the top of the bead head, making sure the hanger comes out the top. This makes the hat. Leave the head to dry while you make the body.
    4. Cut a piece of cardboard 4 cm long and 3 cm wide. Wind the green cotton or wool round the card EIGHT times. Slide off the card. This makes the arms.
    5. Wind a short length of red cotton or wool round each of the arms near the end and tie a knot.
    6. Cut a piece of cardboard 8 cm long and 3 cm wide. Wind the red cotton or wool round the card TEN times. Slide off the card.
    7. Wind a short length of red cotton or wool round the legs near the ends and tie a knot.
    8. Take the green arms length and fold the red length over the middle of it so the ends hang down evenly.
    9. Take a piece of red cotton or wool and wind it several times round the middle and tie it. This makes the body and legs.
    10. Take the head and dot in the eyes and nose with a black felt-tip pen.
    11. Glue the head to the body and let dry.
    You can hang these individually on your Christmas tree or make a lot of them to string as a garland across your mantelpiece. They're sure to brighten your day and put you in a happy mood! You can't help smiling when you see these mini elf Christmas decorations.


    Wednesday, 14 December 2011

    Christmas in the Dolls House: the Christmas Tree in 1:12 Scale

    Make a miniature Christmas tree 
    I love this time of the year - the decorations, the carol singing, doing the Christmas baking, choosing presents and wrapping them. So yesterday, when we put up a real Christmas tree in our lounge, I put a miniature Christmas tree in the Edwardian dolls house too. This is the one time of the year that I change things around a little in the dolls house; usually I leave the rooms set out without altering any arrangements. But introducing a Christmas tree into the 1:12 scale lounge involves a bit of mini furniture removal and juggling of space.
       I embroidered a small carpet in a poinsettia design, perfect for the festive season, from a pattern in a dolls house magazine a couple of years ago and I brought this out to stand the Christmas tree on. The crackers and baubles and candy canes I made from bits and pieces in my craft stash - crêpe paper, beads, wire and Fimo. The little metal rocking horse charms are the perfect size for ornaments. I pinched toys from the nursery to place under the tree as presents. Also there is one of my favourite things; a fully printed 'Twas the Night Before Christmas' miniature book.
      Making the actual Christmas tree was time-consuming and as boring as pruning roses! It involved taking one large, bright green, fake 'bottlebrush' Christmas tree, a couple of handfuls of lycopodium, (a real dried plant also known as Princess Pine) and craft glue.
      All it took then was the time to dip the end of a piece of lycopodium in the glue and then push it into the fake tree. I started at the bottom and worked my way round and up and up, making sure there were no spaces uncovered, no bits of the 'bottlebrush' showing. Then a quick trim with the nail scissors to deal with any sticking out 'branches' and it was done. Easy but tedious.
      But I think it was well worth it. The tree looks so real. And the dolls house lounge looks very festive.    

    Thursday, 8 December 2011

    Christmas in the Dolls House: the Cake and the Pudding

    Christmas desserts in 1:12 scale
    Have you made your Christmas cake yet? I baked  my real one a couple of weeks ago. This miniature one in 1:12 scale I made a couple of years ago. 
       It was very easy, a block of polymer clay simply decorated with some loops of thin strands of Fimo. I put a thick edging around the base and made a pattern  indented with a needle. The creation is topped with Fimo holly leaves and berries.
       Making the Christmas pudding was a little bit more complicated. I baked very thin 'worms' of red and green Fimo, then chopped them into tiny pieces. This made them look like glace cherries in the mixture. I worked a dark brown and light brown mix of the polymer clay lightly together, chopped it into bits with a razor blade, mixed them together again (just a little, to keep the colours separate), then chopped again.
       To this I added some poppy seeds and the green and red 'cherries'. I then shaped all of this into a ball and baked it for 15 minutes at 100° C. It has a realistic look, doesn't it, a Christmas pudding with lots of fruit in it.
      When I was a child I didn't like Christmas pudding. But I ate it nevertheless - to get the sixpences that Mum hid in it!

    Tuesday, 6 December 2011

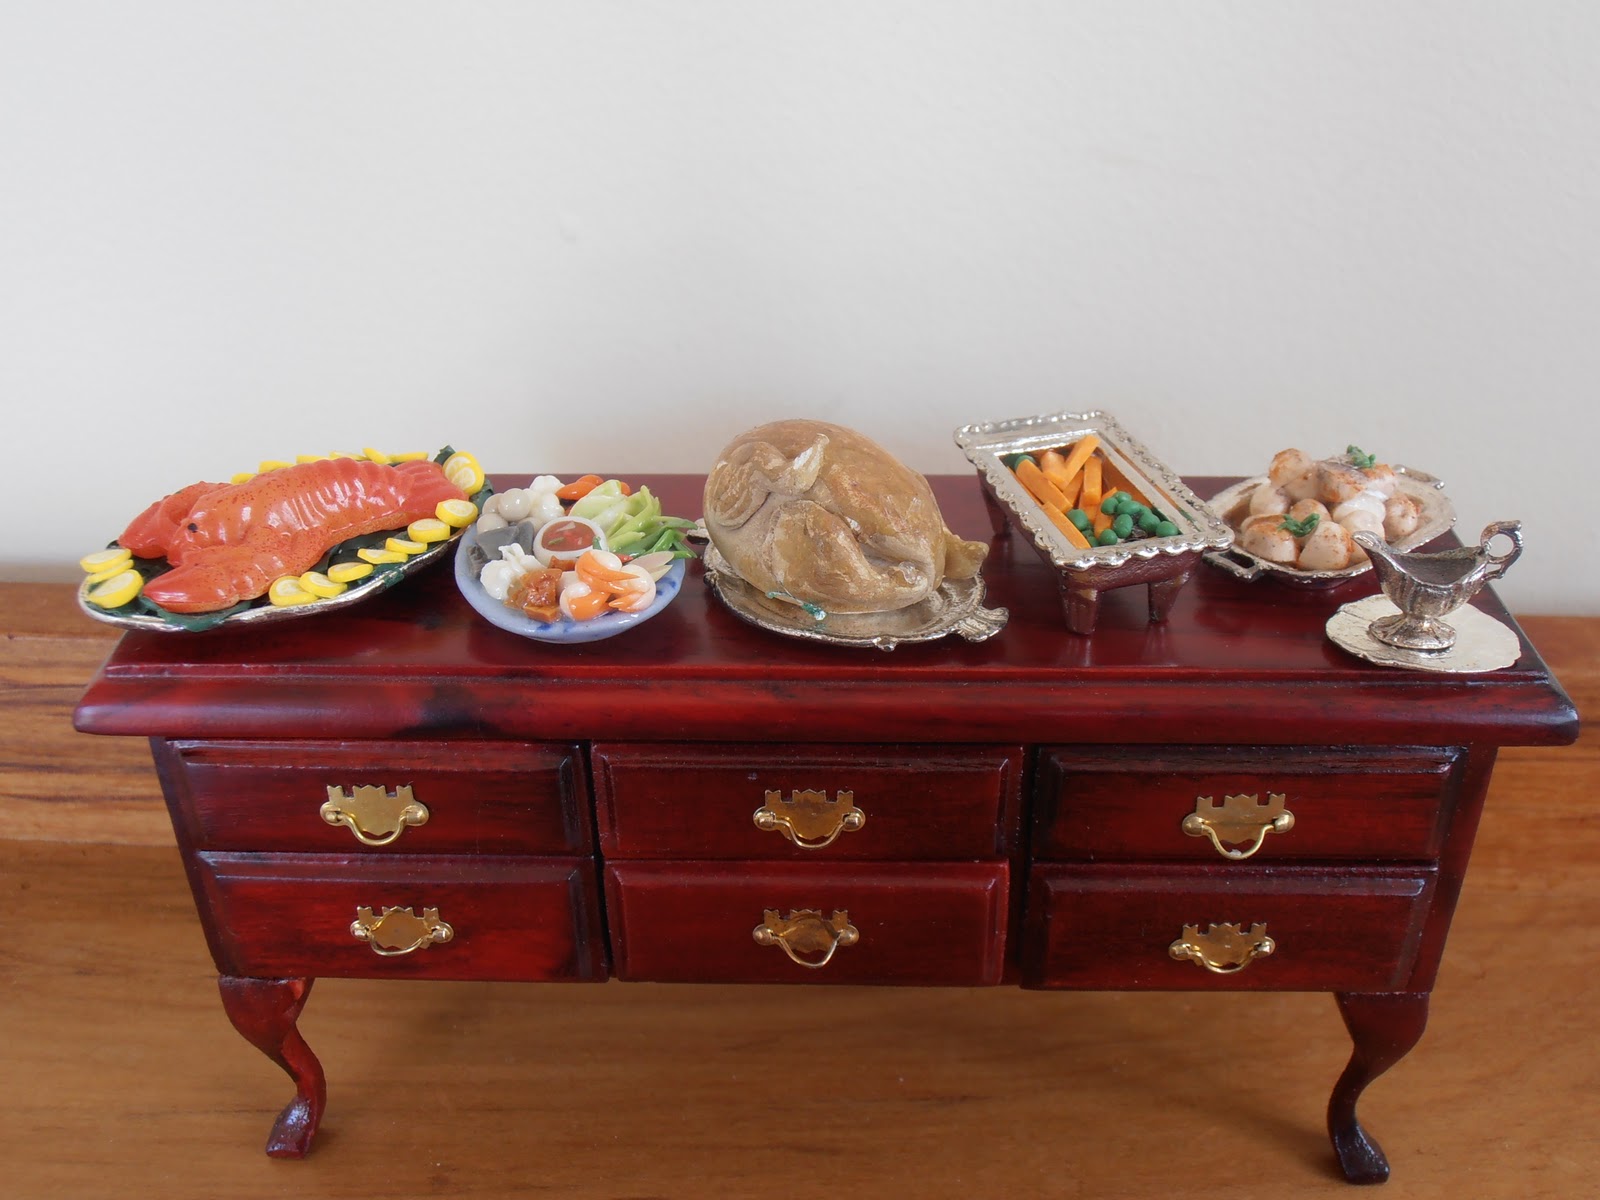
    Christmas in the Dolls House: the Christmas Dinner in 1:12 Scale

    A miniature Christmas dinner in 1:12 scale
    I started doing my Christmas baking on the weekend, which made me think about putting out some Christmas food in the Edwardian dolls house.   
       I looked through my stash of the dishes I have made using Fimo polymer clay to find some suitable for a roast dinner to display on the dining room sideboard. I chose goose as the main dish because the Edwardians were fond of a nice plump bird of that ilk for their festivities.
       I had a little plastic lobster (goodness knows where I got that from!) that I put on a platter lined with lettuce leaves and edged with lemon slices. I made the lemons after watching an Angie Scarr video about how to make Fimo canes.
       The lettuce was a bit different. I wanted the leaves to be very fine so mixed together green acrylic paint and PVA glue. With a paintbrush, I spread a layer onto a tile and let it dry.Then, using a razor blade, I peeled bits off. They looked very realistic when crumpled slightly and put on the plate.
       The roast potatoes were easy to make out of beige polymer clay, rolled into egg shapes then cut in half and dusted with powdered ochre pastel. A couple of sprigs of parsley brightened them up.
       I have to admit I didn't make the crudites on the blue plate. That is actually a magnet I bought in Singapore, one of my brilliant mini finds.
       The carrots and peas caused me a bit of grief. I took the sideboard with the food on it out of the dolls house to photograph, then promptly dropped it as I was putting it all back in. Everything stayed together except for the dish of those vegetables. I'm still finding tiny little green peas in the dolls house, under the dolls house and behind the dolls house!

    Friday, 2 December 2011

    Christmas in the Dolls House: How to Make a Bowl of Nuts

    A miniature bowl of nuts
    When I was a girl, we always had a wooden bowl of nuts in the shell and a nutcracker on the table at Christmas. I wanted to recreate some of my childhood traditions in dolls house scale.
       Here are the instructions to make a nut bowl for Christmas in the dolls house.
       You will need:
    • packet of coriander seeds
    • the cap off an acorn
    • emery board
    • PVA glue
    • varnish or clear nail polish
    • metal 1:12 scale nutcracker
    • paint or Vivid marker
    1. Use the emery board to sand the acorn cap smooth. If you like a more rustic look, leave the cap as it is.
    2. Varnish the cap inside and out.
    3. Glue some coriander seeds into the acorn cap. They are the right size for walnuts in 1:12 scale. Include a few empty half shells so it looks as if someone has started eating them!
    4. Wash the metal nutcracker in warm, soapy water. Paint the handles or colour them with a Vivid marker.
    5. Glue the nutcracker across the top of the 'bowl'.
    6. Place the bowl on a table in your dolls house living room or dining room, perhaps next to a glass of wine.